Let’s spend about ten minutes together — I’ll walk you through using Terraform to build a private GKE Cluster step by step!
Setting Up GCP

Create a Service Account
First, go to the Google Cloud console and create a Service Account for Terraform to use. Follow steps 1, 2, and 3 in the diagram above. If you already have a Service Account, you can skip this step.
For permissions, I’m giving it Editor role since this is just a POC. If you’re setting this up for production, check the documentation and set permissions appropriately.
Create a Key
Step 4 is generating a Key. We’ll need this Key shortly when writing the Terraform configuration.
Building GKE
1. Define Variables
Let’s start writing Terraform!
First, let’s define some variables so you can quickly copy and paste to set up GKE.
# GCP Project ID
variable "gcp_project_id" {
  default = "alan-zhan-proj"
}

# GKE location
variable "gcp_region" {
  default = "asia-east1"
}

variable "subnet_cidr" {
  default = "10.0.0.0/24"
}

variable "pod_cidr" {
  default = "10.0.8.0/21"
}

variable "service_cidr" {
  default = "10.0.1.0/24"
}

# Master CIDR must be /28
variable "master_cidr" {
  default = "10.0.2.0/28"
}
2. Configure the Provider
Create a provider.tf file and add the following content.
terraform {
  required_providers {
    google = {
      source = "hashicorp/google"
    }
  }
}

provider "google" {
  project = var.gcp_project_id
  region  = var.gcp_region
  # Enter the path to the key you just downloaded
  credentials = "./xxx.json"
}
3. Init Project
Next, initialize the Terraform project with terraform init.
terraform init

Initializing the backend...

Initializing provider plugins...
- Finding latest version of hashicorp/google...
- Installing hashicorp/google v4.56.0...
- Installed hashicorp/google v4.56.0 (signed by HashiCorp)

Terraform has created a lock file .terraform.lock.hcl to record the provider
selections it made above. Include this file in your version control repository
so that Terraform can guarantee to make the same selections by default when
you run "terraform init" in the future.

Terraform has been successfully initialized!

You may now begin working with Terraform. Try running "terraform plan" to see
any changes that are required for your infrastructure. All Terraform commands
should now work.

If you ever set or change modules or backend configuration for Terraform,
rerun this command to reinitialize your working directory. If you forget, other
commands will detect it and remind you to do so if necessary.
4. Configure Service APIs
Private GKE requires Compute and Container services during creation, so create a service.tf file with the following content.
resource "google_project_service" "compute" {
  project = var.gcp_project_id
  service = "compute.googleapis.com"
}

resource "google_project_service" "container" {
  project = var.gcp_project_id
  service = "container.googleapis.com"
}
5. Configure Networking
Create a network.tf file and configure network settings.
resource "google_compute_network" "gke" {
  name = "gke"
  auto_create_subnetworks = false
  delete_default_routes_on_create = false
  mtu = 1460
  routing_mode = "REGIONAL"
}

resource "google_compute_subnetwork" "gke" {
  name          = "gke-subnet"
  ip_cidr_range = var.subnet_cidr
  region        = var.gcp_region
  network       = google_compute_network.gke.id
  private_ip_google_access = true

  secondary_ip_range {
    range_name    = "k8s-pod-range"
    ip_cidr_range = var.pod_cidr
  }
  secondary_ip_range {
    range_name    = "k8s-service-range"
    ip_cidr_range = var.service_cidr
  }
}

resource "google_compute_router" "gke" {
  name    = "gke"
  region  = var.gcp_region
  network = google_compute_network.gke.id
}

resource "google_compute_router_nat" "gke" {
  name   = "nat"
  router = google_compute_router.gke.name
  region = var.gcp_region

  source_subnetwork_ip_ranges_to_nat = "LIST_OF_SUBNETWORKS"
  nat_ip_allocate_option             = "MANUAL_ONLY"

  subnetwork {
    name                    = google_compute_subnetwork.gke.id
    source_ip_ranges_to_nat = ["ALL_IP_RANGES"]
  }

  nat_ips = [google_compute_address.gke.self_link]
}

resource "google_compute_address" "gke" {
  name         = "nat"
  address_type = "EXTERNAL"
  network_tier = "PREMIUM"
  region = var.gcp_region

  depends_on = [google_project_service.compute]
}
6. Service Account
Create service-account.tf to set up a dedicated service account for GKE nodes.
resource "google_service_account" "gke" {
  account_id = "kubernetes"
}
7. GKE
Create container.tf — let’s build the GKE cluster! I’ll also create spot instance nodes.
During Terraform’s GKE creation process, a default node is always created regardless of whether you set remove_default_node_pool = true. The default node is only deleted after GKE is successfully created.
resource "google_container_cluster" "gke" {
  name                     = "primary"
  location                 = var.gcp_region
  remove_default_node_pool = true
  initial_node_count       = 1
  network                  = google_compute_network.gke.self_link
  subnetwork               = google_compute_subnetwork.gke.self_link
  logging_service          = "logging.googleapis.com/kubernetes"
  monitoring_service       = "monitoring.googleapis.com/kubernetes"
  networking_mode          = "VPC_NATIVE"

  # Optional: customize node locations
#  node_locations = [
#    ""
#  ]

  addons_config {
    http_load_balancing {
      disabled = true
    }
    horizontal_pod_autoscaling {
      disabled = true
    }
  }

  release_channel {
    channel = "REGULAR"
  }

#  workload_identity_config {
#    workload_pool = "xxx.svc.id.goog"
#  }

  ip_allocation_policy {
    cluster_secondary_range_name  = "k8s-pod-range"
    services_secondary_range_name = "k8s-service-range"
  }

  private_cluster_config {
    enable_private_nodes    = true
    enable_private_endpoint = false
    master_ipv4_cidr_block  = var.master_cidr
  }
}

resource "google_container_node_pool" "general" {
  name       = "general"
  cluster    = google_container_cluster.gke.id
  node_count = 1

  management {
    auto_repair  = true
    auto_upgrade = true
  }

  node_config {
    preemptible  = false
    machine_type = "e2-small"

    labels = {
      role = "general"
    }

    service_account = google_service_account.gke.email
    oauth_scopes = [
      "https://www.googleapis.com/auth/cloud-platform"
    ]
  }
}

resource "google_container_node_pool" "gke" {
  name    = "spot"
  cluster = google_container_cluster.gke.id

  management {
    auto_repair  = true
    auto_upgrade = true
  }

  autoscaling {
    min_node_count = 0
    max_node_count = 10
  }

  node_config {
    preemptible  = true
    machine_type = "e2-small"

    labels = {
      team = "spot"
    }

    taint {
      key    = "instance_type"
      value  = "spot"
      effect = "NO_SCHEDULE"
    }

    service_account = google_service_account.gke.email
    oauth_scopes = [
      "https://www.googleapis.com/auth/cloud-platform"
    ]
  }
}
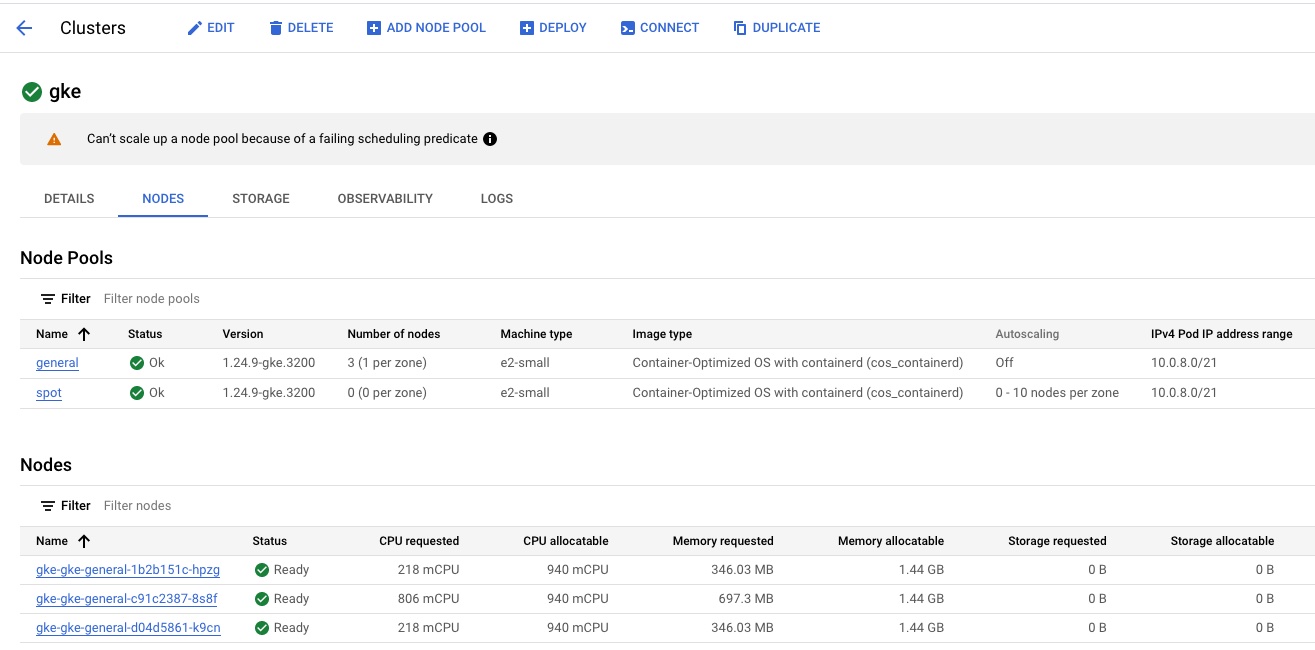
8. Terraform Apply
Run terraform apply to create the GKE cluster. Done!
Conclusion
Building GKE with Terraform is fast and convenient. It also gave me a chance to review Google Cloud services. Best of all, we can repeatedly replicate successful setups to quickly create GKE clusters.
If you’re interested, you can copy and paste from here: Github Source Code
Feel free to leave a comment on my blog. Your feedback motivates me to keep writing. Thank you for reading, and let’s grow together to become better versions of ourselves.